贡献
Spring Cloud 采用非限制性的 Apache 2.0 许可发布,并遵循非常标准的 Github 开发流程,使用 Github 跟踪器处理问题并将拉取请求合并到 main 分支。即使您想贡献一些微不足道的东西,也请不要犹豫,但请遵循以下准则。
开发者原产地证书 (DCO)
所有提交必须在每个提交消息的末尾包含一个 Signed-off-by 尾注,以表明贡献者同意开发者原产地证书。有关更多详细信息,请参阅博客文章 Hello DCO, Goodbye CLA: 简化对 Spring 的贡献。
行为准则
本项目遵循贡献者盟约 行为准则。通过参与,您需要遵守此准则。请将不可接受的行为报告给 [email protected]。
代码约定和内务管理
这些对于拉取请求都不是必不可少的,但它们都会有所帮助。它们也可以在原始拉取请求之后但在合并之前添加。
-
使用 Spring Framework 代码格式约定。如果您使用 Eclipse,可以使用来自 Spring Cloud Build 项目的
eclipse-code-formatter.xml文件导入格式化程序设置。如果使用 IntelliJ,可以使用 Eclipse Code Formatter Plugin 导入相同的文件。 -
确保所有新的
.java文件都包含一个简单的 Javadoc 类注释,至少包含一个标识您的@author标签,并且最好至少有一个段落说明该类的用途。 -
将 ASF 许可头注释添加到所有新的
.java文件中(从项目中的现有文件复制) -
如果您对
.java文件进行了大量修改(不仅仅是表面上的更改),请将自己添加为@author。 -
添加一些 Javadoc,如果您更改了命名空间,还要添加一些 XSD 文档元素。
-
一些单元测试也会有很大帮助——总得有人去做。
-
如果没有其他人使用您的分支,请将其重新基于当前的 main(或主项目中的其他目标分支)。
-
编写提交消息时请遵循 这些约定,如果您正在修复现有问题,请在提交消息末尾添加
Fixes gh-XXXX(其中 XXXX 是问题编号)。
Checkstyle
Spring Cloud Build 带有一组 Checkstyle 规则。您可以在 spring-cloud-build-tools 模块中找到它们。该模块下最值得注意的文件是
└── src
    ├── checkstyle
    │   └── checkstyle-suppressions.xml (3)
    └── main
        └── resources
            ├── checkstyle-header.txt (2)
            └── checkstyle.xml (1)
| 1 | 默认 Checkstyle 规则 |
| 2 | 文件头设置 |
| 3 | 默认抑制规则 |
Checkstyle 配置
Checkstyle 规则默认禁用。要将 Checkstyle 添加到您的项目中,只需定义以下属性和插件。
<properties>
<maven-checkstyle-plugin.failsOnError>true</maven-checkstyle-plugin.failsOnError> (1)
        <maven-checkstyle-plugin.failsOnViolation>true
        </maven-checkstyle-plugin.failsOnViolation> (2)
        <maven-checkstyle-plugin.includeTestSourceDirectory>true
        </maven-checkstyle-plugin.includeTestSourceDirectory> (3)
</properties>

<build>
        <plugins>
            <plugin> (4)
                <groupId>io.spring.javaformat</groupId>
                <artifactId>spring-javaformat-maven-plugin</artifactId>
            </plugin>
            <plugin> (5)
                <groupId>org.apache.maven.plugins</groupId>
                <artifactId>maven-checkstyle-plugin</artifactId>
            </plugin>
        </plugins>

    <reporting>
        <plugins>
            <plugin> (5)
                <groupId>org.apache.maven.plugins</groupId>
                <artifactId>maven-checkstyle-plugin</artifactId>
            </plugin>
        </plugins>
    </reporting>
</build>
| 1 | 在 Checkstyle 错误时导致构建失败 |
| 2 | 在 Checkstyle 违规时导致构建失败 |
| 3 | Checkstyle 也分析测试源 |
| 4 | 添加 Spring Java Format 插件,它将重新格式化您的代码以通过大多数 Checkstyle 格式化规则 |
| 5 | 将 Checkstyle 插件添加到您的构建和报告阶段 |
如果您需要抑制某些规则(例如,行长度需要更长),那么只需在 ${project.root}/src/checkstyle/checkstyle-suppressions.xml 下定义一个包含您的抑制项的文件即可。例如
<?xml version="1.0"?>
<!DOCTYPE suppressions PUBLIC
		"-//Puppy Crawl//DTD Suppressions 1.1//EN"
		"https://www.puppycrawl.com/dtds/suppressions_1_1.dtd">
<suppressions>
	<suppress files=".*ConfigServerApplication\.java" checks="HideUtilityClassConstructor"/>
	<suppress files=".*ConfigClientWatch\.java" checks="LineLengthCheck"/>
</suppressions>
建议将 ${spring-cloud-build.rootFolder}/.editorconfig 和 ${spring-cloud-build.rootFolder}/.springformat 复制到您的项目中。这样,一些默认格式化规则将被应用。您可以通过运行此脚本来完成此操作
$ curl https://raw.githubusercontent.com/spring-cloud/spring-cloud-build/main/.editorconfig -o .editorconfig
$ touch .springformat
IDE 设置
IntelliJ IDEA
为了设置 IntelliJ,您应该导入我们的编码约定、检查配置文件并设置 Checkstyle 插件。以下文件可以在 Spring Cloud Build 项目中找到。
└── src
    ├── checkstyle
    │   └── checkstyle-suppressions.xml (3)
    └── main
        └── resources
            ├── checkstyle-header.txt (2)
            ├── checkstyle.xml (1)
            └── intellij
                ├── Intellij_Project_Defaults.xml (4)
                └── Intellij_Spring_Boot_Java_Conventions.xml (5)
| 1 | 默认 Checkstyle 规则 |
| 2 | 文件头设置 |
| 3 | 默认抑制规则 |
| 4 | 适用于 IntelliJ 的项目默认设置,应用大多数 Checkstyle 规则 |
| 5 | 适用于 IntelliJ 的项目样式约定,应用大多数 Checkstyle 规则 |

转到 File → Settings → Editor → Code style。在那里点击 Scheme 部分旁边的图标。然后,点击 Import Scheme 值并选择 Intellij IDEA code style XML 选项。导入 spring-cloud-build-tools/src/main/resources/intellij/Intellij_Spring_Boot_Java_Conventions.xml 文件。

转到 File → Settings → Editor → Inspections。在那里点击 Profile 部分旁边的图标。然后,点击 Import Profile 并导入 spring-cloud-build-tools/src/main/resources/intellij/Intellij_Project_Defaults.xml 文件。
为了使 IntelliJ 与 Checkstyle 配合使用,您必须安装 Checkstyle 插件。建议同时安装 Assertions2Assertj 以自动转换 JUnit 断言。
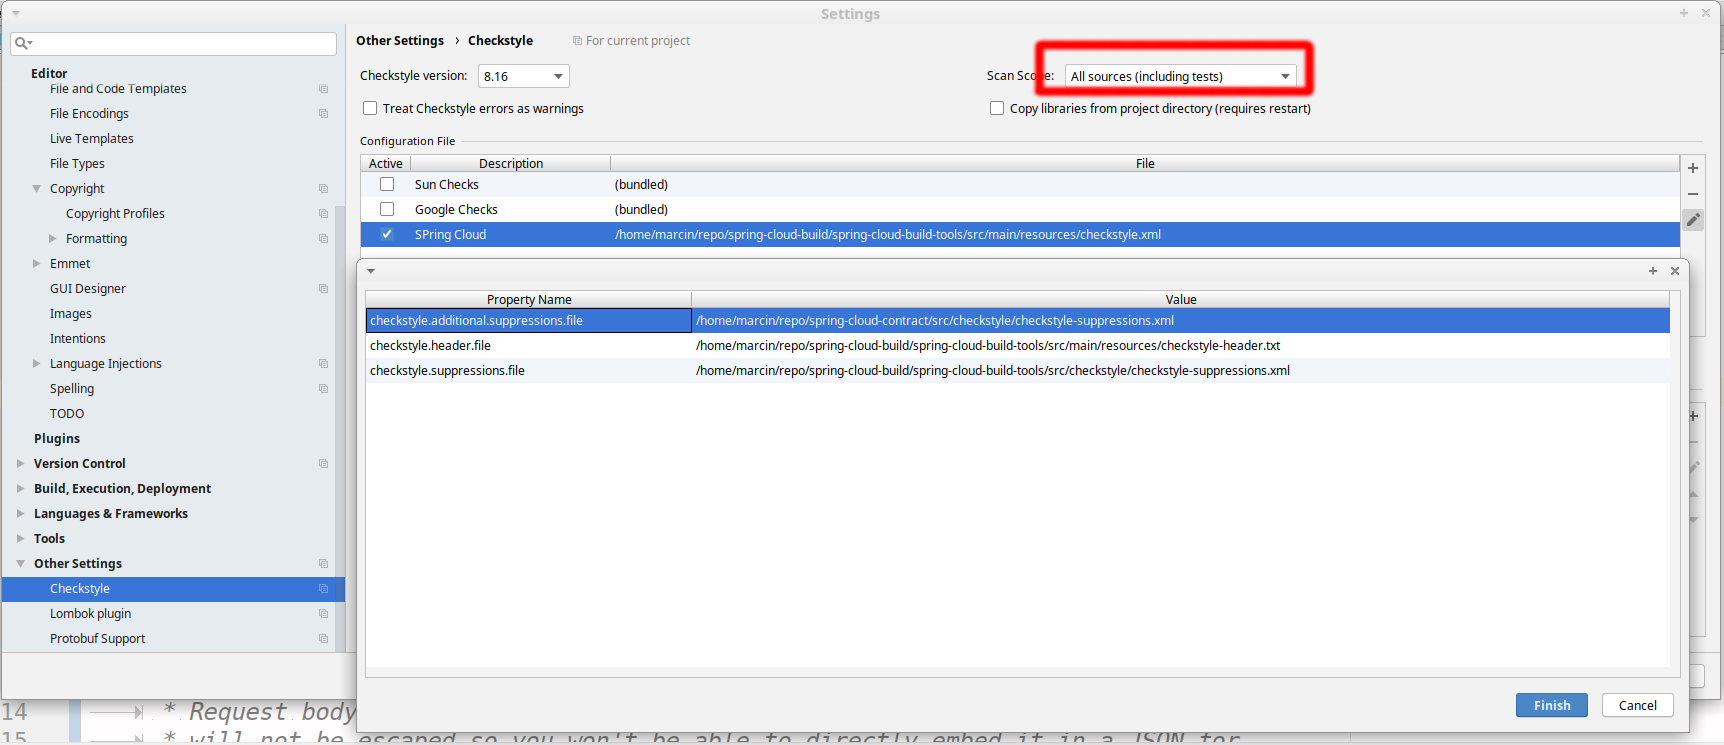
转到 File → Settings → Other settings → Checkstyle。在那里点击 Configuration file 部分中的 + 图标。在那里,您必须定义 Checkstyle 规则应该从哪里获取。在上面的图像中,我们从克隆的 Spring Cloud Build 仓库中选择了规则。但是,您可以指向 Spring Cloud Build 的 GitHub 仓库(例如对于 checkstyle.xml:raw.githubusercontent.com/spring-cloud/spring-cloud-build/main/spring-cloud-build-tools/src/main/resources/checkstyle.xml)。我们需要提供以下变量
-
checkstyle.header.file- 请将其指向 Spring Cloud Build 的spring-cloud-build-tools/src/main/resources/checkstyle-header.txt文件,无论是在您克隆的仓库中还是通过raw.githubusercontent.com/spring-cloud/spring-cloud-build/main/spring-cloud-build-tools/src/main/resources/checkstyle-header.txtURL。 -
checkstyle.suppressions.file- 默认抑制项。请将其指向 Spring Cloud Build 的spring-cloud-build-tools/src/checkstyle/checkstyle-suppressions.xml文件,无论是在您克隆的仓库中还是通过raw.githubusercontent.com/spring-cloud/spring-cloud-build/main/spring-cloud-build-tools/src/checkstyle/checkstyle-suppressions.xmlURL。 -
checkstyle.additional.suppressions.file- 此变量对应于您本地项目中的抑制项。例如,您正在处理spring-cloud-contract。然后指向project-root/src/checkstyle/checkstyle-suppressions.xml文件夹。spring-cloud-contract的示例为:/home/username/spring-cloud-contract/src/checkstyle/checkstyle-suppressions.xml。
请记住将 Scan Scope 设置为 All sources,因为我们对生产和测试源应用 Checkstyle 规则。 |
重复查找器
Spring Cloud Build 带来了 basepom:duplicate-finder-maven-plugin,它能够在 Java classpath 上标记重复和冲突的类和资源。
重复查找器配置
重复查找器默认启用,并将在 Maven 构建的 verify 阶段运行,但只有当您将 duplicate-finder-maven-plugin 添加到项目 pom.xml 的 build 部分时,它才会在您的项目中生效。
<build>
    <plugins>
        <plugin>
            <groupId>org.basepom.maven</groupId>
            <artifactId>duplicate-finder-maven-plugin</artifactId>
        </plugin>
    </plugins>
</build>
对于其他属性,我们已设置了 插件文档 中列出的默认值。
您可以通过设置所选属性的值并加上 duplicate-finder-maven-plugin 前缀来轻松覆盖它们。例如,将 duplicate-finder-maven-plugin.skip 设置为 true 以跳过构建中的重复检查。
如果您需要将 ignoredClassPatterns 或 ignoredResourcePatterns 添加到您的设置中,请确保将它们添加到您项目的插件配置部分
<build>
    <plugins>
        <plugin>
            <groupId>org.basepom.maven</groupId>
            <artifactId>duplicate-finder-maven-plugin</artifactId>
            <configuration>
                <ignoredClassPatterns>
				    <ignoredClassPattern>org.joda.time.base.BaseDateTime</ignoredClassPattern>
					<ignoredClassPattern>.*module-info</ignoredClassPattern>
				</ignoredClassPatterns>
                <ignoredResourcePatterns>
                    <ignoredResourcePattern>changelog.txt</ignoredResourcePattern>
                </ignoredResourcePatterns>
            </configuration>
        </plugin>
    </plugins>
</build>
